Pages

Thursday, June 30, 2011

Art Tuesday: Cutting Bouquets


The great thing about doing art projects with friends is that they come up with things I never would have, and vice versa. I loved this flower-making project because it utilized such a range of visual and motor skills, engaged our preschoolers for a long time, and each unique flower was perfect as it was.

First, we twisted our floral wire bases - even in these, each one was different, yet perfect - there are a lot of ways to make a wire stand!

Then we traced circles on colored paper using cups, and cut them out. Taped one on the wire for a center, and cut slits in the others to make petals. Slide the petals on, tape the base to a paper for greater stability, and voila!

The 3-year-old lost interest after cutting a few circles, but our 4-year-olds held focus and made two flowers each! Here's Ginger's:Here's mine:Then we went outside and cut our own real bouquets from my friend's gorgeous hydrangea bushes and flower garden; we each got to take our bouquet home in a Wendy's cup. Pretty much another perfect Art Tuesday.
Cutting Bouquets
What you need:

  • 18-inch floral wire (comes in a long skinny pack from craft stores)
  • colored paper
  • cup, cookie cutter or other round template
  • scissors
  • pencil
  • tape
What to do:
1. Twist wire into a spiral base so it will stand up.

    2. Trace circles onto colored paper with a pencil and cut them out.
    3. Tape one circle to the top of the wire. Fold the other circles in half and cut a slit about halfway up from the folded edge. Don't cut it all the way in half! Slide the slit onto the center circle, and gently open the folded circle to spread the petals a bit. Adjust the petals or wire so it will keep standing. Repeat with more petals.

    4. Optional- tape the wire base to a piece of paper or cardboard to help stabilize it.

Wednesday, June 29, 2011

Thursday, June 23, 2011

14 Months

I was just going to write a quickie update on Poppy, then I got a call to go pick up Hazel at the school clinic so this will be even shorter than quickie. Just look how beautiful she is:She loves reading books, being held, saying "Mama!" one million times each day, yelling at the top of her lungs, rough housing, climbing, shoes, getting wet, grapes, pasta with red sauce, fruit snacks, playing with food cans, and toothbrushes.

She does not love milk, being scolded, or sitting still.

She is always cute...but cutest when sleeping or laughing. Gotta run!

Tuesday, June 21, 2011

Art Tuesday: Squeezing Shapes

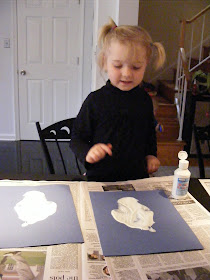
This week's art project turned out even better than expected. For "Squeezing Shapes" we squeezed tempera paint onto thick paper, then pressed another piece on top, gently peeled off, and named the gorgeous shapes we made.

Then we read the book It Looked Like Spilt Milk by Charles G. Shaw. Each page shows a white shape on a blue background, with text following this pattern - "It looked like ________. But it wasn't _________." Then at the end it says that it was just a cloud in the sky. The kids had a great time naming the shapes (squirrel, butterfly, etc.)
Then we went back to the counter and made shapes with white paint on blue paper.
Overall a highly successful Art Tuesday. Some of the prints came out so beautifully I think we will frame them.

Squeezing Shapes
Supplies:
  • Tempera paint
  • Squeezy bottles if the paint doesn't come in them
  • Newspapers for covering work surface
  • Thick paper like cardstock, posterboard or watercolor paper (construction paper is too thin)
Cover work surface in newspaper. Give each child a thick piece of paper and whatever color(s) paint they choose. Squeeze paint in a design on the paper. Place another piece of paper on top, lining up edges as well as possible. Press with hands. Carefully peel papers apart. Look at the designs and discuss what you see in them - have the child name the shapes.
Parent rating: Easy
Child rating: Fun

Monday, June 20, 2011

Fashion Week, continued

A few days after that last post, Hazel picked her own outfit, from head to toe. I loved it.(And that blur of white in the background is Poppy trying to make off with Hazel's raincoat while we are distracted!)

Tuesday, June 14, 2011

Fashion Week

Hellooo. I've gone and made a new Listmania! list. It gives me the feeling of being organized. I think you'll like it:

We have a few fashionistas around here. Poppy's got a new shoe fettish and likes to get her hair "done" in the morning with her sisters (though she won't keep any bobs in.)

And. I got the girls Fashion Plates - anyone remember those? Like this but the originals, with all the 70's hair and clothes. Paid an arm and a leg on ebay for a complete set. But I love them and so do the girls. Watch our walls for some new decor...

Tuesday, June 07, 2011

Art Tuesday: Dipping Colors

Now that Ginger is out of school for three whole months, and ballet is over (the recital was adorable!), I am trying to add a modicum of structure to our days. Henceforth, every Tuesday we will be doing an art project. A real art project, not just coloring or gluing. I got a pretty good book, Art for the Very Young. Plus Young at Art is great. And there are lots of online sources as well.

So as often as I remember, or feel like it, I'll be sharing our Art Tuesdays. I expect some will be more fun and/or successful than others. I am not an artist myself at all. But I like creating things, working with my hands, and spending time with Ginger (and in a few weeks, Hazel.) And I love shopping for art supplies. So we will just give it a shot.

First up, a project called Dipping Colors. Easy, fun, cheap - all I could want in a project.

Dipping Colors

What you need:

  • paper coffee filters (or paper towels)
  • muffin tin (standard or mini)
  • food coloring
  • newspaper
  • water
1. Fill a few muffin cups with water. Color the water with food coloring.

2. Fold the coffee filter/paper towel in quarters. Let the child dip the paper into the colors, watch it spread, turn it, dip another part in another color, etc.
3. Unfold the paper and lay flat on newspaper to dry.Uses: hang the tie-dyed circles from a curtain rod, string or hook for decorations, tape to windows, glue on craft paper to make wrapping paper, or poke a hole through the center and fiddle a pipe cleaner through to make paper flowers.

Child Rating (how much the kid actually liked doing it): ***** (5/5)

Friday, June 03, 2011

Frosting for the Cause: Pistachio-Cardamom Cupcakes with Lemon Cream Cheese Frosting

Look at me, I'm a guest blogger. Several months ago I signed up with "Frosting for the Cause" to write a post, donate my cupcakes, and donate $25 to cancer research. June 3 was my day, and now it's here. I'm super impressed with this project, and mastermind Paula's management of it. I hope you'll go over and check it all out. If for nothing else, my Pistachio-Cardamom Cupcakes with the BEST EVER Lemon Cream Cheese Frosting.

Also, I am fascinated by these Chocolate Cherry Coke Float Cupcakes. Can't wait to try them.